Welcome to your new favorite Italian-American comfort food: this ultimate Stuffed Manicotti Recipe. There is something profoundly satisfying about pulling a rustic, heavy cast-iron skillet out of the oven, bubbling with rich meat sauce and golden-brown melted cheese. This dish perfectly captures the essence of a hearty, home-cooked masterpiece that brings everyone to the dinner table.
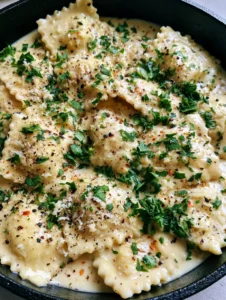
Our visually stunning approach ensures every element is meticulously crafted for maximum flavor. Picture several large, tender pasta tubes generously filled with a fluffy ricotta cheese mixture. They are blanketed in a thick, rich, and incredibly chunky ground beef and tomato meat sauce. 
The crowning glory is the bubbly, golden-brown melted mozzarella cheese on top, finished with a bright sprinkle of fresh chopped parsley. This Stuffed Manicotti Recipe is designed to replicate that mouth-watering, rustic aesthetic while delivering unparalleled culinary perfection in every single bite.
Why This Stuffed Manicotti Recipe is a Rustic Masterpiece
Creating an authentic, appetite-appealing baked pasta requires balancing textures and flavors. This specific technique guarantees a structurally sound and incredibly delicious meal.
- The Perfect Textural Contrast: The delicate, al dente manicotti tubes perfectly encase the incredibly light and fluffy ricotta filling.
- Hearty, Chunky Meat Sauce: Unlike flat marinara, our robust ground beef tomato sauce adds necessary vertical height and deep, savory layers to the skillet.
- Cast-Iron Caramelization: Baking this Stuffed Manicotti Recipe in a rustic cast-iron skillet ensures even heat distribution, resulting in perfectly caramelized edges.
- Golden-Brown Cheese Pull: The strategic broiler finish ensures the melted mozzarella develops those irresistible, bubbly golden-brown spots.
Foundational Elements for Our Hearty Baked Pasta
Every ingredient in this dish serves a specific structural or flavor-enhancing purpose. Using exact measurements ensures your final presentation perfectly matches our visual blueprint.
The Pasta and Fluffy Filling
Manicotti Shells: You will need 8 oz (225g) of large dried manicotti pasta tubes. These act as the sturdy vessel for our cheese filling and hold their shape beautifully during the bake.
Whole Milk Ricotta Cheese: Use 15 oz (425g) of high-quality whole milk ricotta. The higher fat content is scientifically necessary to create the exceptionally fluffy, rich texture in the center of the pasta.
Large Egg: Include 1 large egg (about 50g). This acts as the critical culinary binder, preventing the ricotta from turning watery and melting out of the tubes.
Parmesan Cheese: Add 1/2 cup (50g) of freshly grated Parmesan. It provides a sharp, salty bite that cuts through the creaminess of the ricotta.
Salt and Black Pepper: Use 1 tsp (5g) kosher salt and 1/2 tsp (1g) ground black pepper. These foundational invisible ingredients elevate the dairy flavors and perfectly season the filling.
The Chunky Ground Beef Meat Sauce
Lean Ground Beef: Brown 1 lb (450g) of 80/20 ground beef. The fat ratio provides enough richness to flavor the sauce while yielding those hearty, meaty chunks seen in the rustic skillet.
Extra Virgin Olive Oil: Heat 1 tbsp (15ml) of olive oil to initiate the searing process. This invisible foundational ingredient ensures the meat achieves a proper Maillard reaction for deep flavor.
Yellow Onion and Garlic: Dice 1 cup (150g) of yellow onion and mince 3 cloves (15g) of fresh garlic. These aromatics build the sweet and pungent flavor base essential for an authentic Italian meat sauce.
Crushed Tomatoes: Pour in 28 oz (794g) of canned crushed tomatoes. Their naturally thick consistency binds the ground beef together, creating a rich, robust blanket for the pasta.
Dried Italian Seasoning: Incorporate 1 tbsp (5g) of dried Italian herbs. This provides the classic earthy undertones that marry the beef and tomato flavors perfectly.
The Bubbly Golden Topping
Shredded Mozzarella Cheese: Top the skillet with 1.5 cups (170g) of whole milk shredded mozzarella. It melts into a lush, stretchy blanket that turns golden brown under the heat of the oven.
Fresh Chopped Parsley: Finish with 2 tbsp (8g) of fresh chopped parsley. This adds a crucial touch of vibrant green color and a fresh, herbaceous pop that cuts through the heavy richness of the dish.
Essential Tools for Skillet-Baked Perfection
Using the correct equipment is just as important as the ingredients. These tools ensure your dish looks incredibly appetizing and cooks evenly.
First, a 12-inch cast-iron skillet is mandatory for this recipe. The heavy iron conducts heat beautifully, bubbling the sauce from edge to edge and providing that rustic aesthetic. 
Second, a large disposable piping bag (or a zip-top bag with the corner snipped) is a secret weapon. It allows you to inject the fluffy ricotta mixture directly into the pasta tubes cleanly and efficiently.
Crafting Your Stuffed Manicotti Recipe Step-by-Step
Follow these precise culinary steps to ensure your pasta is tender, your sauce is rich, and your cheese is perfectly caramelized. Pay close attention to the sensory cues provided.
Simmering the Chunky Ground Beef Meat Sauce
Begin by heating the olive oil in your 12-inch cast-iron skillet over medium-high heat. Add the ground beef, breaking it apart with a wooden spoon into large, hearty chunks.
Listen for the aggressive sizzle; allow the beef to sear undisturbed for a few minutes until a deep brown crust forms. Once browned, drain excess fat if necessary, then lower the heat to medium.
Stir in the diced onion and minced garlic, sautéing until the onion becomes translucent and wonderfully fragrant. Pour in the crushed tomatoes, dried Italian herbs, salt, and pepper.
Reduce the heat to low and let the meat sauce simmer gently for 15 minutes. Watch as the sauce thickens and reduces, turning into a rich, robust, and chunky topping.
Boiling the Pasta to Al Dente
While the sauce simmers, bring a large pot of heavily salted water (about 1 tbsp (15g) salt per gallon) to a rolling boil. Carefully drop in the manicotti shells.
Boil the pasta for exactly 2 minutes less than the package instructions indicate. You want them to be very firm (al dente) so they don’t tear while stuffing and won’t turn to mush during the final bake.
Drain the shells carefully and lay them out on a piece of parchment paper to cool slightly. Do not rinse them; the residual starch helps the sauce cling to the tubes.
Whipping the Fluffy Ricotta Mixture
In a large mixing bowl, combine the whole milk ricotta, egg, grated Parmesan, salt, and black pepper. Use a whisk or a heavy spoon to beat the mixture vigorously for 60 seconds.
This vigorous mixing introduces air into the cheese, guaranteeing that perfectly fluffy ricotta texture described in our visual blueprint. Transfer this smooth mixture into your piping bag.
Assembling and Baking in Cast Iron
Preheat your oven to 375°F (190°C). Remove exactly half of the chunky meat sauce from the cast-iron skillet and set it aside, leaving a thick layer of sauce at the bottom of the pan.
Carefully insert the tip of your piping bag into each cooled manicotti shell. Squeeze from the top down, filling each tube generously until the ricotta mixture is flush with both ends.
Arrange the stuffed pasta tubes side-by-side in the cast-iron skillet directly over the bottom layer of sauce. Spoon the reserved chunky ground beef and tomato meat sauce generously over the top, covering the pasta completely.
Cover the skillet tightly with aluminum foil and bake for 25 minutes. Carefully remove the foil, sprinkle the bubbly surface evenly with the shredded mozzarella cheese, and bake uncovered for an additional 10 minutes.
For that ultimate mouth-watering finish, switch your oven to broil for the final 2 minutes. Watch closely as the mozzarella morphs into a bubbly, golden-brown crust. Remove from the oven and instantly garnish with the fresh chopped parsley.
Chef’s Secrets for the Best Stuffed Manicotti Recipe
Achieving restaurant-quality results at home requires a few professional troubleshooting tricks. Keep these expert tips in mind.
- Prevent Shell Tearing: Always undercook the pasta slightly and handle it gently with tongs. If a shell splits, simply place the split side down in the skillet; the sauce will hide the imperfection.
- The Perfect Cheese Pull: Grate your own mozzarella from a block. Pre-shredded cheeses contain anti-caking agents that prevent that beautiful, stretchy, golden-brown melt.
- Sauce Consistency: If your crushed tomatoes are excessively watery, simmer the meat sauce for an extra 10 minutes. A thick sauce is crucial to prevent a soupy skillet.
- Resting is Required: Allow the baked manicotti to rest for 10 minutes before serving. This allows the hot ricotta filling to set, ensuring clean, beautiful cuts.
Preserving and Reheating Your Baked Pasta
This hearty comfort food makes incredible leftovers. Proper storage ensures the textures remain intact for days.
Allow the skillet to cool completely, then transfer the remaining manicotti to an airtight container. Store in the refrigerator for up to 4 days.
To reheat, place a portion in a microwave-safe dish with a splash of water, cover, and heat for 2-3 minutes. Alternatively, reheat in a 350°F (175°C) oven covered with foil until the center is piping hot.
You can also freeze this unbaked. Assemble the dish in a freezer-safe pan, wrap tightly in plastic wrap and foil, and freeze for up to 3 months. Thaw overnight in the fridge before baking.
Perfect Pairings for Your Italian Feast
A rustic, heavy pasta dish begs for the right side dishes to balance the meal. You want options that provide crunch, acidity, or an extra layer of comfort.
Nothing sops up leftover rich tomato meat sauce quite like a slice of fresh, warm garlic herb dutch oven bread. It is the absolute perfect vehicle for cleaning your plate.
If you are hosting a large gathering, start the evening off with a bubbling baked spinach artichoke dip to keep guests happy while the manicotti bakes. Alternatively, pair it with a light side salad or serve it alongside a steaming bowl of lasagna soup for the ultimate cozy winter menu.
Finally, round out the authentic Italian-American dining experience with a slice of rich, creamy classic cheesecake for dessert.
Answering Your Top Stuffed Manicotti Recipe Questions
Home cooks frequently have questions about mastering stuffed pasta. Here are the most common inquiries regarding this dish.
Yes! This dish freezes beautifully. Assemble the manicotti in a freezer-safe container, wrap tightly in plastic wrap and aluminum foil, and freeze for up to 3 months. Thaw overnight in the refrigerator before baking.
Absolutely. You can assemble the entire dish in your skillet or baking pan, cover it tightly with foil, and refrigerate it up to 24 hours before baking. Add 5-10 extra minutes to the initial covered bake time if cooking straight from the fridge.
Yes, for the best texture, boil the manicotti shells for exactly 2 minutes less than the package directs. This ensures they are pliable enough to stuff but sturdy enough to hold their shape during baking.
The easiest method is to transfer your fluffy ricotta cheese mixture into a large disposable piping bag or a zip-top bag with the corner snipped off. Squeeze the filling directly into the slightly cooled pasta tubes.
Watery filling usually happens if you use part-skim ricotta or skip the egg. Using whole milk ricotta and adding one large egg acts as a culinary binder, keeping the cheese incredibly fluffy and stable inside the pasta.
The Ultimate Cast-Iron Stuffed Manicotti Recipe
You are now fully equipped to recreate this mouth-watering, home-cooked masterpiece. Gather your ingredients, heat up that cast-iron skillet, and prepare for an incredible dinner.
Stuffed Manicotti Recipe: Authentic Cast-Iron Baked Pasta
Ingredients
Equipment
Method
- Heat the olive oil in a 12-inch cast-iron skillet over medium-high heat. Add the ground beef, breaking it into hearty chunks. Sizzle until a deep brown crust forms, then drain excess fat and lower the heat to medium.
- Stir in the diced onion and minced garlic, sautéing until translucent. Pour in the crushed tomatoes, dried Italian herbs, salt, and pepper. Simmer gently on low for 15 minutes until thick and chunky. Set half the sauce aside.
- Bring a large pot of heavily salted water to a rolling boil. Cook the manicotti shells for exactly 2 minutes less than package instructions for a firm al dente texture. Drain carefully and cool on parchment paper.
- In a mixing bowl, vigorously whisk the whole milk ricotta, egg, grated Parmesan, salt, and black pepper for 60 seconds until light and fluffy. Transfer to a piping bag.
- Preheat oven to 375°F (190°C). Insert the piping bag tip into each cooled manicotti shell and squeeze until the fluffy ricotta mixture is flush with both ends.
- Arrange the stuffed pasta side-by-side in the cast-iron skillet directly over the remaining bottom layer of sauce. Spoon the reserved chunky meat sauce generously over the top of the pasta.
- Cover tightly with foil and bake for 25 minutes. Uncover, sprinkle with shredded mozzarella, and bake for 10 more minutes. Switch oven to broil for 2 minutes until the cheese is bubbly and golden-brown. Garnish with fresh chopped parsley and let rest 10 minutes before serving.
Notes
Tip 2: Grate your own block mozzarella to ensure a stretchy, perfectly golden-brown cheese pull.
Tip 3: Allowing the skillet to rest for 10 minutes before serving ensures the ricotta filling sets properly for clean portions.

Join Our Culinary Community
If this Stuffed Manicotti Recipe brought warmth and joy to your dinner table, we would love to hear about it! The rich, chunky meat sauce and fluffy ricotta filling are truly a labor of love worth sharing.
Please leave a rating and comment below to let us know how your rustic skillet turned out. Do not forget to pin this recipe for later and follow us on Pinterest for more incredible, mouth-watering meal inspiration!