Deviled Egg Macaroni Salad is the ultimate comfort food fusion, combining the rich, tangy flavors of a classic deviled egg with the hearty satisfaction of a traditional pasta salad. This recipe is designed to be the star of your next potluck, featuring a glossy, thick mayonnaise dressing that clings to every ridge of the pasta.
If you have been searching for a side dish that balances material realism in its textures—crunchy, creamy, and tender all at once—you have found it. The vibrant dusting of red paprika over irregular chunks of hard-boiled eggs creates a visual masterpiece that tastes even better than it looks.
Whether you are hosting a summer BBQ or looking for a reliable meal-prep lunch, this Deviled Egg Macaroni Salad delivers on every front. Let’s dive into the culinary science of making the perfect creamy dressing and the secret to those beautiful golden yolks.

Why This Deviled Egg Pasta Salad Wins Every Potluck
- Unmatched Texture: The combination of tender elbow macaroni with ridges and firm, translucent egg whites provides a satisfying mouthfeel.
- The Gloss Factor: We use a specific ratio of fats and acids to ensure the dressing remains glossy and thick, never watery or oily.
- Visual Appeal: With scattered bits of crunchy green celery and small red onion pieces, this dish pops with color and organic overlapping of ingredients.
- Classic Flavor Profile: It captures the nostalgia of a deviled egg—mustard, vinegar, and a hint of sweetness—perfectly balanced with savory pasta.
Essential Ingredients for a Glossy, Creamy Finish
Creating a Deviled Egg Macaroni Salad that doesn’t soak up all the dressing requires high-quality ingredients and a few culinary tricks. Here is what you will need:
1 lb (454g) Elbow Macaroni: Choose a brand with deep ridges. These ridges are essential for “trapping” the dressing, ensuring every bite is flavorful.
6 Large Hard-Boiled Eggs: These provide the “deviled” essence. We will separate some yolks to cream into the dressing, while leaving the rest as irregular chunks for texture.
1.5 cups (360ml) Real Mayonnaise: This is the base of our glossy, thick dressing. Do not use salad dressing; real mayo provides the necessary fat for a silkier finish.
2 tbsp (30ml) Yellow Mustard: Provides that signature tang and the vibrant yellow hue associated with deviled eggs.
1 tbsp (15ml) Apple Cider Vinegar: The acid cuts through the richness of the mayo and eggs, brightening the entire dish.
1 cup (120g) Celery: Finely diced for that essential crunchy green contrast against the soft pasta.
1/2 cup (60g) Red Onion: Small pieces offer a sharp, pungent bite that balances the creamy elements.
1 tsp (5g) Smoked Paprika: A light dusting adds a smoky depth and the iconic visual finish seen in professional food photography.
Salt and Black Pepper: To taste. Never underestimate the power of seasoning the pasta water and the dressing separately.
How to Make Deviled Egg Macaroni Salad Step-by-Step
Perfecting the Al Dente Macaroni
Start by bringing a large pot of salted water to a boil. Add the 1 lb (454g) elbow macaroni and cook according to package directions, but aim for the lower end of the time scale.
Visual Cue: The pasta should be tender but still have a slight “bite.” Overcooked pasta will turn mushy once the dressing is added.
Once cooked, drain the pasta and rinse immediately with cold water. Rinsing stops the cooking process and removes excess starch, which prevents the Deviled Egg Macaroni Salad from becoming a sticky clump.
Mastering the Hard-Boiled Eggs
While the pasta cooks, prepare your eggs. Place 6 eggs in a saucepan, cover with water, and bring to a boil. Turn off the heat, cover, and let sit for 12 minutes.
Transfer the eggs to an ice bath. This ensures the yolks remain golden and creamy rather than developing a gray ring. Once cool, peel and chop them into irregular chunks.
Pro Tip: Take two of the cooked yolks and mash them into a fine paste. We will whisk these directly into our mayo base to amplify the “deviled” flavor profile.

Whisking the Glossy Mayonnaise Dressing
In a large mixing bowl, combine the 1.5 cups (360ml) mayonnaise, yellow mustard, apple cider vinegar, mashed yolks, salt, and pepper. Whisk vigorously until the mixture is completely smooth.
Sensory Cue: The dressing should look glossy and thick, with a vibrant yellow color. If it feels too thick, add a teaspoon of pickle juice for extra zing.
This is the stage where you can customize the flavor. Some prefer a touch of sugar for a sweet-and-savory vibe, similar to the dressing used in a creamy dessert salad.
The Final Assembly and Styling
Add the cooled macaroni, diced celery, red onion, and the remaining irregular egg chunks to the dressing bowl. Fold gently using a large spatula to avoid breaking the translucent, firm whites.
Ensure every ridge of the macaroni is coated. The styling should look beautifully messy, with ingredients overlapping naturally.
Transfer to a rustic bowl and finish with a generous dusting of red paprika. For the best flavor, refrigerate for at least one hour before serving to let the flavors meld.
Expert Tips for Success
- Don’t Skip the Rinse: Rinsing the pasta is controversial in hot dishes, but for cold Deviled Egg Macaroni Salad, it is vital to keep the dressing glossy.
- Season in Layers: Season the pasta water, the dressing, and the final salad. Cold dishes require more seasoning than hot ones.
- The “Spoon Test”: When you lift a scoop with a silver spoon, the dressing should be thick enough to stay on the pasta, not drip off instantly.
- Add Fresh Herbs: A sprinkle of fresh dill or parsley can add another layer of flavor, much like the herbaceous notes found in a cowboy butter.
Storage, Reheating & Freezing
Storage: Keep your Deviled Egg Macaroni Salad in an airtight container in the refrigerator for up to 3-4 days. The flavors actually improve on the second day.
Refreshing: If the pasta absorbs too much dressing overnight, stir in a tablespoon of milk or a tiny bit more mayo before serving to restore that glossy texture.
Freezing: We do not recommend freezing this salad. Mayonnaise-based dressings tend to separate and become oily when thawed, ruining the creamy consistency.
What to Serve With This Creamy Salad
This salad is incredibly versatile. It pairs beautifully with grilled proteins or other picnic staples. For a complete spread, consider these options:
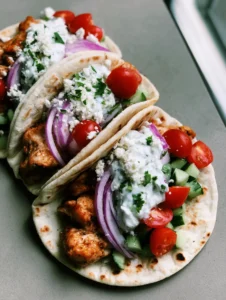
If you are aiming for a Mediterranean theme, serve this alongside Greek chicken gyros. The creaminess of the salad balances the charred, spiced chicken perfectly.
For a lighter vegetable-forward meal, pair it with a marinated cauliflower salad to provide a crisp, acidic contrast to the rich eggs and mayo.
Frequently Asked Questions
Yes! In fact, it tastes better after chilling for at least 2-4 hours, which allows the flavors of the mustard, vinegar, and spices to fully penetrate the pasta.
Boil the eggs for exactly 12 minutes and immediately move them to an ice bath. This prevents the unsightly gray ring and keeps the yolks vibrant and creamy.
Elbow macaroni with ridges is superior because the ridges act like ‘sauce-catchers,’ ensuring the thick deviled egg dressing doesn’t just slide off the pasta.
Pasta naturally absorbs liquid. To prevent this, rinse your pasta in cold water to remove excess starch and use a high-fat mayonnaise base. If it’s dry the next day, stir in a teaspoon of milk or mayo.
The Ultimate Deviled Egg Macaroni Salad Recipe Card

Deviled Egg Macaroni Salad: The Ultimate Creamy Picnic Recipe
Ingredients
Equipment
Method
- Cook elbow macaroni in salted boiling water until al dente. Drain and rinse with cold water immediately.
- Boil eggs for 12 minutes, then shock in an ice bath. Peel and chop into irregular chunks.
- In a large bowl, whisk mayo, mustard, vinegar, and 2 mashed yolks until thick and glossy.
- Fold pasta, celery, onion, and remaining egg chunks into the dressing. Dust with paprika and chill.
Notes
Mashing two yolks into the dressing is the secret to the best color and flavor.

Save This Recipe to Pinterest!
Do you love this Deviled Egg Macaroni Salad? Don’t lose the recipe! Click the “Save” button on the image above to add it to your favorite Pinterest board. Following Noudish_Recipes ensures you never miss a viral potluck hit!
We want to see your results! If you make this dish, please upload a photo in the comments below and leave a 5-star rating. Your feedback helps our community of home cooks grow!