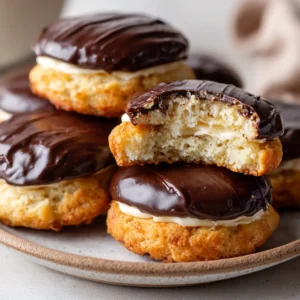
There is nothing quite like the nostalgic, decadent magic of Boston Cream Pie Cookies. Imagine a home-cooked masterpiece arranged on a rustic light-colored plate, begging to be devoured. One single, clean bite reveals exactly what makes this dessert legendary: a luxuriously fluffy vanilla cream filling hidden inside.
These treats capture the viral food blog aesthetic, bridging the gap between a traditional bakery cake and a handheld cookie. They feature a distinctly golden-brown cakey texture that perfectly supports the rich layers above. Bathed in the glow of bright kitchen lighting, the contrasting textures make this dessert look incredibly appealing.
The crowning glory is, without a doubt, the thick, glossy, dark chocolate topping that cascades slightly over the edges. If you’ve been searching for a show-stopping dessert that balances rich cocoa, delicate vanilla, and a buttery crumb, this is the only recipe you will ever need.
Why These Golden-Brown Cakey Treats Will Steal the Show
- Sensory Perfection: The contrast between the soft, cake-like base and the snap of the glossy dark chocolate topping is highly addictive.
- Visual Appeal: A stunning macro-worthy dessert! The moment someone takes a bite, the hidden fluffy vanilla cream center is revealed.
- Handheld Convenience: You get all the authentic, mouth-watering flavors of a classic Boston cream pie without needing a fork or a cake stand.
- Structural Integrity: Scientifically balanced with baking powder and milk to ensure the cookie stays thick enough to hold the cream without crumbling.

The Secret Components for the Perfect Cookie Dough and Filling
All-Purpose Flour: You need 2 cups (240g) of standard all-purpose flour. This provides the exact structural gluten matrix required to hold the heavy cream and chocolate.
Baking Powder & Cornstarch: We use 1 ½ tsp (6g) of baking powder for a cakey rise, and 1 tbsp (8g) of cornstarch. The cornstarch tenderizes the crumb, giving you that authentic soft texture.
Unsalted Butter: exactly ½ cup (113g) of softened butter. It adds rich flavor while allowing us to control the exact sodium level of the dough.
White Granulated Sugar: ¾ cup (150g) of sugar creams with the butter to create micro-air pockets. This ensures your cookies puff up beautifully in the oven.
Egg & Whole Milk: 1 large egg (50g) binds the dough, while ¼ cup (60ml) of whole milk provides the crucial hydration needed for a cake-like, rather than chewy, texture.
Heavy Cream & Vanilla Pudding Mix: To create the fluffy vanilla cream filling, whip ½ cup (120ml) of heavy cream with 2 tbsp (20g) of instant vanilla pudding mix. The pudding mix acts as a stabilizer, ensuring the cream won’t melt or deflate.
Dark Chocolate & Corn Syrup: ½ cup (85g) of premium dark chocolate chips mixed with 3 tbsp (45ml) of heavy cream and 1 tsp (5ml) of light corn syrup. The corn syrup is the culinary secret to that thick, glossy finish.
Essential Tools for Flawless Filling and Glazing
To recreate this viral aesthetic at home, you need the right tools. A heavy-duty aluminum baking sheet ensures even, golden-brown baking without scorching the bottoms.
You will also need a round tablespoon or melon baller. This is critical for pressing the “crater” into the warm cookies immediately after they exit the oven.
Finally, a piping bag fitted with a round tip makes injecting the fluffy vanilla cream effortless and visually neat.

Step-by-Step Blueprint to the Perfect Fluffy Vanilla Cream Center
Whipping Up the Cakey Dough
Preheat your oven to 350°F (175°C) and line a baking sheet with parchment paper. In a large bowl, cream the ½ cup (113g) butter and ¾ cup (150g) sugar on medium-high speed for 3 minutes until pale and fluffy. Add the egg and 1 tsp (5ml) vanilla extract, beating until fully combined.
In a separate bowl, whisk the 2 cups (240g) flour, 1 tbsp (8g) cornstarch, 1 ½ tsp (6g) baking powder, and ½ tsp (3g) salt. Gradually add the dry ingredients to the wet mixture, alternating with the ¼ cup (60ml) milk, mixing just until a soft, sticky dough forms.
Baking and Indenting the Cookies
Scoop 2-tablespoon-sized portions of dough and roll them into smooth balls. Place them 2 inches apart on the baking sheet. Bake for 10-12 minutes until the edges are a pale golden-brown.
Here is the critical step: The moment the cookies come out of the oven, use the back of a measuring spoon to gently press a deep well or crater into the center of each cookie. Let them cool completely on a wire rack.
Creating the Stabilized Vanilla Cream
While the cookies cool, pour the ½ cup (120ml) heavy whipping cream, ¼ cup (60ml) milk, and 2 tbsp (20g) instant vanilla pudding mix into a chilled metal bowl. Whip on high speed for 2-3 minutes.
The mixture will rapidly transform into a thick, fluffy vanilla cream. Transfer this mixture into your piping bag. Pipe a generous dollop of cream into the cooled crater of each cookie, smoothing the top slightly.
Mastering the Glossy Dark Chocolate Ganache
In a microwave-safe bowl, combine the ½ cup (85g) dark chocolate chips, 3 tbsp (45ml) heavy cream, and 1 tsp (5ml) light corn syrup. Heat in 15-second bursts, stirring vigorously between each interval until smooth, glossy, and completely melted.
Spoon about 1 tablespoon of the warm dark chocolate topping over the vanilla cream on each cookie. Carefully spread it to the edges, ensuring the cream is completely sealed inside. Chill in the refrigerator for 20 minutes to set the chocolate.
Culinary Troubleshooting for that Glossy Dark Chocolate Finish
- Do Not Overbake: For the ultimate cakey texture, pull the cookies when the centers still look slightly soft. They will continue to set on the baking sheet.
- Indent While Hot: If you wait even two minutes to press the crater into the cookies, the top crust will crack extensively. Press them the exact second they exit the oven.
- Chill the Cream: Ensure your heavy cream is fridge-cold before whipping. Warm cream will not achieve the fluffy, stable volume required to hold up the heavy chocolate topping.
- Glossy Ganache Secret: If you omit the corn syrup, you can substitute it with 1 tsp (5g) of softened butter to maintain that highly photogenic, viral glossy sheen.
Keeping the Cakey Texture Fresh: Storage & Freezing
Because these Boston Cream Pie Cookies contain dairy in both the filling and the topping, they must be stored in the refrigerator. Place them in a single layer in an airtight container; they will stay fresh and delicious for up to 4 days.
If you wish to freeze them, freeze the baked, unfilled cookie bases in a freezer-safe bag for up to 3 months. Thaw them at room temperature, then add the freshly whipped vanilla cream and chocolate glaze the day you plan to serve them.
What to Serve With Your Decadent Chocolate-Topped Dessert
These rich cookies demand a complimentary spread, especially if you are hosting a party. If you are arranging a dessert table, contrast these heavy chocolate treats with lighter, fruity options like vibrant strawberry cheesecake cookies.
For a brunch setting, pair them with cinnamon-sugar coated homemade churro cruffins to offer your guests a diverse texture experience. The pairing of vanilla cream and cinnamon is truly unmatched.
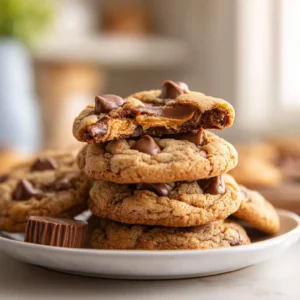
If you’re catering to serious sweet-tooths, serve these alongside decadent stuffed peanut butter treats or even slices of a rich traditional classic cheesecake (coming soon). The rustic plating of all these desserts will make your kitchen look like a professional bakery.
Frequently Asked Questions About Boston Cream Pie Cookies
Yes. You can bake the cookie bases up to 2 days in advance and store them in an airtight container at room temperature. For the best texture, fill with the vanilla cream and top with chocolate glaze the day you plan to serve them.
Yes. Because the fluffy vanilla filling is made with dairy (heavy cream and milk), these cookies must be stored in the refrigerator. They will stay fresh in an airtight container for up to 4 days.
The secret to a viral, bakery-style glossy finish is adding 1 teaspoon of light corn syrup or softened butter to your warm chocolate and cream mixture. This prevents the chocolate from drying matte.
Cookies will severely crack if they begin to cool before you indent them. You must use your measuring spoon to press the crater into the dough the exact second you pull the baking sheet out of the oven while the structure is still incredibly soft.
The heavy cream must be completely cold straight from the refrigerator. If the cream or the mixing bowl is warm, the milk fat won’t emulsify properly, preventing the instant pudding mix from creating that stiff, fluffy volume.
The Official Recipe for Boston Cream Pie Cookies
Now that you understand the culinary science behind the fluffy filling and the glossy chocolate top, it’s time to bake! Follow the measurements exactly for an authentic, mouth-watering result.
The Ultimate Boston Cream Pie Cookies Blueprint
Ingredients
Equipment
Method
- Preheat oven to 350°F (175°C) and line a baking sheet with parchment paper. In a bowl, whisk the flour, cornstarch, baking powder, and salt.
- In a large bowl, cream the softened butter and sugar on medium-high speed for 3 minutes until pale and fluffy. Add the egg and vanilla extract, beating until fully combined.
- Gradually add the dry ingredients to the wet mixture, alternating with the 1/4 cup whole milk. Mix just until a soft, sticky dough forms.
- Scoop 2-tablespoon-sized portions of dough, roll into smooth balls, and place 2 inches apart on the baking sheet. Bake for 10-12 minutes until the edges are pale golden-brown.
- The exact moment the cookies exit the oven, use the back of a measuring spoon to gently press a deep well or crater into the center of each. Let cool completely on a wire rack.
- Pour the 1/2 cup heavy whipping cream, 1/4 cup milk, and instant vanilla pudding mix into a chilled bowl. Whip on high speed for 2-3 minutes until thick and fluffy. Transfer to a piping bag.
- Pipe a generous dollop of the vanilla cream into the cooled crater of each cookie, smoothing the top slightly.
- In a microwave-safe bowl, combine the dark chocolate chips, 3 tbsp heavy cream, and light corn syrup. Heat in 15-second bursts, stirring until smooth and completely melted.
- Spoon about 1 tablespoon of warm dark chocolate topping over the cream on each cookie, spreading to the edges to seal the cream inside. Chill in the refrigerator for 20 minutes to set.
Notes
Indent While Hot: Press the crater into the cookies the exact second they exit the oven to prevent cracking.
Glossy Ganache: Substitute corn syrup with 1 tsp of softened butter to maintain the glossy sheen.

Share Your Golden-Brown Masterpieces!
There is nothing quite like taking that first clean bite and revealing the creamy center of these Boston Cream Pie Cookies! Your family and friends are guaranteed to be impressed by your baking skills.
If you loved the thick, glossy, dark chocolate topping and cakey base, please leave a 5-star rating and a comment below. Don’t forget to pin this recipe to your dessert boards on Pinterest to save it for your next baking weekend!